
Tech Friday – Facebook Photo Quality Test – Revisited
Facebook's Photo Quality
Back in March I posted about Facebook's photo quality. I know I wasn't the only person who hated how horrible the picture quality was at the time. Over the last few months Facebook has made drastic improvements to its photo upload quality. And I must say, even though it's not perfect, the upload quality is pretty decent. So I thought I would revisit the issue and perform a few more tests to find out the what settings give you the best result.
Look through the photos below and you can immediately see how much higher the quality is now than before.
(Click for larger view)

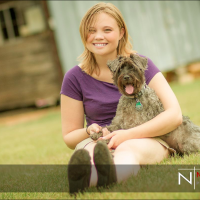
The above photo is the best example of the quality improvements. It was exported out of Lightroom: 1200 x 1200, 72 ppi, Sharpen for Screen – High (this is most important). Uploaded to Facebook as "High Quality". The key is to over, over sharpen! Click here to see photo on Facebook. Below is a screenshot of the export settings for Lightroom:

If you save out of Photoshop you will need to resize the photo to 1200 x 1200 and change the resolution to 72 ppi. You will need to perform a "smart sharpen" filter before saving though. Change the Amount to 150% and Radius to 0.3px (again this is the most important part!). See below for screenshot of the settings:

(Click for larger view)

Above you see all the same settings as the previous except there was no Screen Sharpening perform before export. You can really see the difference in the dog's face also in her shirt. This may not seem like alot and most non-photographer would probably not even notice a lick of difference. But regardless use the settings that give you the best result. It doesn't require any more time to export or to upload the file. You can see the photo on Facebook here. And it can make a significant difference.
(Click for larger view)

This photo upload instance is what most surprised me with the whole Facebook Upload deal. It was exported with the exact same settings as the first photo. And it appears on Facebook with the same quality. What surprised me though was that it had the same quality this version was uploaded to Facebook without "High Quality" checked. So I'm guessing you only need to select "High Quality" when you're upload a very large photo – like 2500 x 2500 or bigger. You can see the photo on Facebook here.
Conclusion:
Facebook has definitely made great improvements to its photo upload quality. It's not perfect (you can see some bad compression in the watermark) but it is pretty good, when considering the poor quality just in March. The main thing to remember when uploading photos to Facebook is to sharpen, sharpen, sharpen! Facebook does some sort of low pass filter which slightly blurs the photo when it is uploaded and compressed.
Hope this helps everyone. I know it can be frustrating to see your beautiful photos go from amazing to "ugh" when they are uploaded.